A clear Solar System Drawing begins with a simple question: how can you make eight planets recognizable on one small page? Start with a pencil, a ruler, and a sheet of paper. Mark the Sun, then place each planet along a curved path. Keep the planets’ sizes and distances deliberately simplified; accurate scale would leave some worlds nearly invisible.
Astronomer and science communicator Carl Sagan wrote, “Somewhere, something incredible is waiting to be known.” That sense of discovery can guide a drawing, too. Add Mercury as a tiny gray circle, give Saturn its broad rings, and use a soft blue for Neptune. These visual clues help viewers identify each world without crowding the page. Small details matter.
This step-by-step guide will show how to sketch the orbital paths, arrange the planets, and add color and texture. You will also learn where a diagram differs from the real Solar System. The first draft may feel uneven. That is useful information. Check the spacing, darken the planet outlines, and leave enough room for labels. A neat drawing is not automatically a more accurate one. Aim for clarity, make thoughtful choices, and revise what looks confusing.
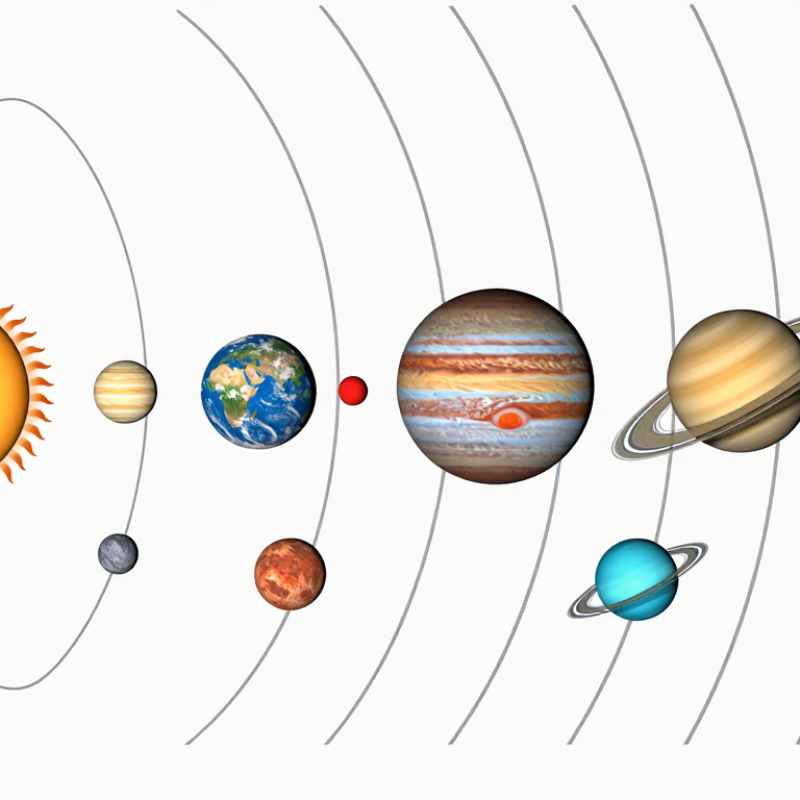
Before drawing, gather a sharp pencil, a soft eraser, a ruler, and plain paper. Colored pencils can add clear planet colors later. Place the paper horizontally to leave room for the planets and their labels. A compass is useful for neat circular orbits, but freehand lines work too. Keep a small reference nearby for the planets’ correct order: Mercury, Venus, Earth, Mars, Jupiter, Saturn, Uranus, and Neptune.
Sketch the Sun near one edge, then lightly mark each planet’s path around it. Leave wider gaps near the outer planets, especially Jupiter and Saturn, so their names and details fit. The distances and planet sizes cannot both be shown accurately on one page, so treat the drawing as a clear diagram rather than a scale model. I sometimes try to make every orbit perfectly even; it can look tidy, but it also hides how far apart the planets are. A quick rough layout helps reveal crowded spots before you commit to darker lines.
Tips: Use faint pencil marks first. Check the planet order before adding color. Leave space for Saturn’s rings and small labels. If the page feels cramped, erase and adjust; the first plan may need a rethink.
Start with a small circle for the Sun, leaving room around it for the orbital paths. NASA reports the Sun’s diameter is about 1.39 million kilometers, so it would dominate a truly scaled drawing. On paper, though, a clear sketch matters more than strict scale. Add a faint center point, then sweep a compass or steady hand around it to mark each planet’s path. Keep the lines light. You may need to erase and redraw.
NASA’s NSSDC Planetary Fact Sheet lists Earth’s average distance from the Sun as about 149.6 million kilometers, compared with roughly 4.5 billion kilometers for Neptune. That enormous difference is hard to show accurately on one page. Space the paths outward, but leave enough room between them for planet labels. Most can look nearly circular at this scale; slight oval shapes add a more natural feel. Draw the inner paths closer together and the outer ones wider apart. My first set often looks too tidy. That is worth reconsidering: real orbital spacing is not a decorative pattern, and a simple sketch can only suggest it. Use a ruler for spacing if it helps, but don’t let perfect rings crowd the page.
Place the Sun at the left edge of your page, then leave room for eight planets in a single row. The order matters: Mercury, Venus, Earth, Mars, Jupiter, Saturn, Uranus, and Neptune. Keep the sequence clear. Add a tiny label beneath each planet if you might mix them up later. This simple layout shows their order, not their true distances or sizes.
Give each planet a distinct shape and color. Mercury can be a small gray circle, while Venus looks pale yellow. Draw Earth blue and green, then make Mars rusty red. Jupiter is much larger, with soft bands across its surface. Add Saturn’s broad ring. Uranus and Neptune can be light blue and deep blue. These colors are helpful clues, not exact scientific portraits.
Use light pencil marks for the first pass. Keep Jupiter visibly larger than the rocky inner planets, but avoid making it so huge that Neptune disappears at the edge. The spacing may look awkward; real planetary distances do not fit neatly on a small page. If the row feels crowded, reduce the gaps evenly rather than changing the order. Check every label before tracing your final lines. A small correction here can save a confusing drawing later.
Begin with the Sun, then place the planets in order: Mercury, Venus, Earth, Mars, Jupiter, Saturn, Uranus, and Neptune. Space them clearly, but remember that a page drawing cannot show their true distances or sizes accurately. Add small details that help each planet feel distinct: Venus’s pale cloud cover, Earth’s blue oceans, and Mars’s rusty surface. Jupiter looks convincing with curved bands and one small oval storm. Keep the marks light at first.
Give Saturn a wide, tilted ring, using two curved lines that pass behind the planet and reappear in front. A narrow gap can separate the ring from Saturn’s edge. Uranus also has rings, but keep them faint so Saturn remains easy to recognize. Add labels with a ruler or steady hand, leaving enough room that words do not overlap. I sometimes crowd the outer planets; shifting a label before outlining saves space. Your first layout may need adjusting.
Tips: Use colored pencils or fine markers, and test colors on scrap paper. Keep it simple. Check each planet’s position before darkening the outlines. If a ring or label looks uneven, revise it rather than hiding it with extra marks. A slightly imperfect sketch can still be clear and engaging.
Use the planets’ equatorial diameters as a reference when adding planetary features, rings, and labels. The values are real measurements; the chart is not a scale drawing.
Drawing tip: Add Saturn’s prominent rings, then label each planet. For a clear illustration, you can adjust planet sizes while keeping their order and labels accurate.
Color gives the solar system drawing its depth. Lay down a pale wash first, then build darker tones around each planet’s edge. NASA’s Solar System Exploration resources show that the planets differ greatly in size and appearance. Keep those contrasts visible: Jupiter needs broad cream and rust bands, while Earth benefits from blue oceans and small green land shapes. The Sun can glow yellow or orange, but leave a thin light rim so it does not merge with the background.
For a believable backdrop, use a dark navy field and add stars sparingly. NASA reports that the Sun contains about 99.8% of the solar system’s mass, a reminder that it should command visual attention even when the drawing is not to scale. Add faint orbit lines with a light pencil or diluted paint. Vary their brightness. A few dust-like dots near the edge can suggest distance, but crowded stars may compete with the planets. My first background often looks too busy; I erase some marks and leave more empty space. Not perfectly neat.
Tips: Test colors on scrap paper before applying them. Use a cotton swab to soften a planet’s shadow, and keep the brightest highlights near the Sun. Let each layer dry before adding fine details.
Use a sharp pencil, soft eraser, ruler, plain paper, and colored pencils. A compass helps, but steady freehand circles work too.
Turn the paper horizontally. Place the Sun near one edge, leaving room for planet paths and labels. Adjust the layout if it feels cramped.
Mercury, Venus, Earth, Mars, Jupiter, Saturn, Uranus, and Neptune. Check the order before adding color; it is easy to mix them up.
No. Both cannot fit accurately on one page. Make a clear diagram instead of a scale model. It is a compromise.
Draw faint paths around a small Sun. Keep inner paths closer together and outer paths farther apart. Leave extra room near Jupiter and Saturn.
Add cream and rust bands to Jupiter, blue oceans and small green shapes to Earth, and yellow or orange to the Sun. Leave a thin light rim around the Sun.
Use dark navy and add only a few stars. Draw faint orbit lines with a light pencil. Empty space matters.
Erase a few lines and shift the planets or labels. Leave room for Saturn’s rings. My first layouts often need another look.
No. Nearly circular paths work well, while slight ovals can look more natural. Perfect rings can make the spacing feel too tidy.
This guide explains how to create a clear and engaging Solar System Drawing, starting with a few basic materials and a plan for arranging the planets on the page. First, sketch the Sun and use curved lines to map out the planets’ orbital paths. Then draw the planets in their correct order from the Sun, keeping their sizes and spacing easy to distinguish so the overall layout is simple to follow.
Once the main shapes are in place, add recognizable details such as surface patterns, Saturn’s rings, and labels for each planet. Finish by refining the outlines, choosing colors, and adding a simple background with stars or other subtle details. Each step builds on the last, helping turn a basic layout into a polished drawing that is both informative and visually appealing.

MH Energy